
Rigol oscilloscope remote control with NI-Visa (SCPI commands)
All new Rigol oscilloscopes have support for National Instruments Visa programming and control standard. This can be a great tool when implementing measurement or test automation functions. This tutorial explains how to use National Instruments Visa to control Rigol oscilloscopes via USB. This text focuses on Rigol DS1074Z oscilloscope model but is also applicable for DS2000 and DS4000 models. The included C example source code demonstrates how to setup connection to the Rigol oscilloscope in 5 steps.
Rigol oscilloscope remote control with NI-Visa in 5 steps
Step 1: Download and install National Instruments Visa environment. The link to the NI-Visa page is included here:
National Instruments Visa page with download link.
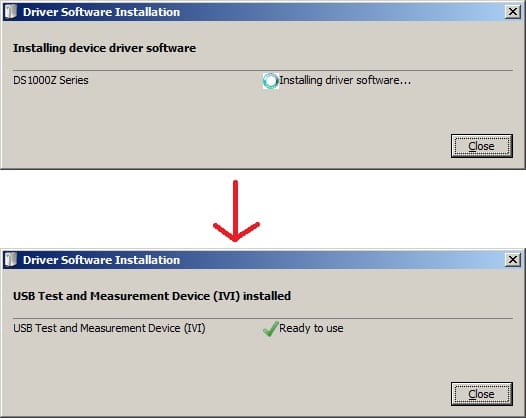
Step 2: After successful installation of the NI-Visa connect your Rigol DS1074Z oscilloscope to PC via USB. If needed install all necessary IVI drivers for your oscilloscope (if you don’t have them please visit Rigol DS1074Z website)
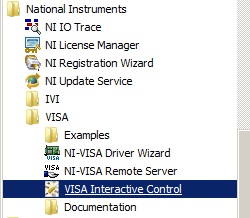
Step 3: To test the remote connection interface run the Visa Interactive Control tool from National Instruments program group.
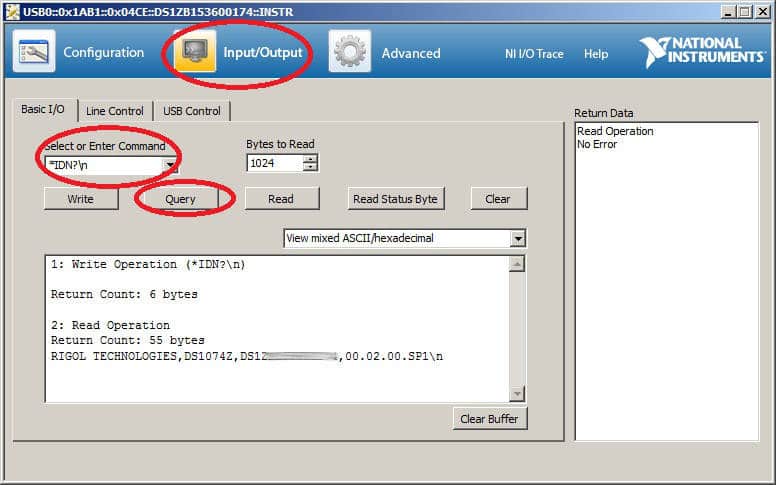
After running the Visa Interactive Control tool all recognized instruments should be visible in USB Instrument Resources drop down list.

Double clicking on the instrument identification string will display a window with instrument information and name. To test the communication command channel please click on “Input/Output” tab at the top of the window. Then type in command field “*IDN?\n” command and click on Query button. The text box will display the response from the oscilloscope. For more SCPI commands accepted by Rigol DS1000Z series oscilloscopes please refer to DS1000Z Programming Guide.
Step 4: If not done already install your favorite C/C++ environment. This can be for example:
- wxDev-C++
- Borland C++ Builder (there is Borland C++ Builder 6 Personal version available for non commercial usage)
- Visual Studio Express Edition for C++
Create a project file and add visa32.lib file from C:\Program Files (x86)\IVI Foundation\VISA\WinNT\lib folder. In lib\bc folder you can find visa32.lib file for Borland compilers. In lib\msc folder you can find visa32.lib for Microsoft environments.

Step 5: To start using NI Visa functions in your project you need to include the “visa.h” header file. The file can be find in header file directory at C:\Program Files (x86)\IVI Foundation\VISA\WinNT\include . You can also copy the file visa.h and visatype.h into your project include directory and add the following line of code to your main program:
#include "visa.h";
Now in your main() function add the following code to detect available instrument resources:
static ViSession defaultRM;
static ViSession rigolOsc=NULL;
static ViUInt32 numInstrs;
static ViFindList findList;
static ViUInt32 readCount;
static ViUInt32 writeCount;
static ViStatus status;


static char strInput[512],strOutput[512];
static char instrResourceString[VI_FIND_BUFLEN];

//open resource manager
status = viOpenDefaultRM (&defaultRM);
if (status < VI_SUCCESS)
return 0; // cannot open resource manager

//find USB instruments resources
status = viFindRsrc (defaultRM, "USB?*INSTR", &findList, &numInstrs, instrResourceString);
if (status < VI_SUCCESS)
return 0; // error finding USB instruments resources

//open Visa session to first instrument resource
status = viOpen (defaultRM, instrResourceString, VI_NULL, VI_NULL, &rigolOsc);
if (status < VI_SUCCESS)
return 0; // error opening Visa session to first instrument resource

//send *IDN? command to the device
strcpy (strInput,"*IDN?\n");
status = viWrite (rigolOsc, (ViBuf)strInput,512 , &writeCount);

status = viRead (rigolOsc, (ViBuf)strOutput,512, &readCount);
if (status < VI_SUCCESS)
{
// cannot read from the device
viClose (rigolOsc);
return 0;
}

//please include here your Rigol ID returned by Visa Interactive Control tool
char RigolOscID[] ={"RIGOL TECHNOLOGIES,DS1074Z,xxxxxx\n"};

if(!strcmp(RigolOscID,strOutput)==0)
{
viClose (rigolOsc); // error this is not our DS1074 oscilloscope
return 0;
}
Whats next?
Please refer to DS1000Z Programming Guide for oscilloscope SCPI commands for remote control. One interesting feature in test automation applications is pass/fail test. It allows to test the signal waveform by applying specified signal mask. If the signal fits into the specified mask region the test is reported as passed. In case of signal mask hit test is reported as failed. This allows to test various analog and digital signal waveforms.

To enable the pass/fail test remotly in your oscilloscope include this function in your project:
ViStatus viCmd(ViSession dev, char *str)
{
static ViUInt32 writeCount;
return viWrite (dev, (ViBuf)str, (ViUInt32)strlen(str), &writeCount);
}
And then after NI-Visa initialization function include the following set of command:
status = viCmd(rigolOsc,":MASK:ENABle 1");
status = viCmd(rigolOsc,":MASK:MDISplay ON");
status = viCmd(rigolOsc,":MASK:SOOutput OFF");
status = viCmd(rigolOsc,":MASK:SOURce CHAN1");
For more information how to use pass/fail oscilloscope test in hardware prototype testing please have a look at the following article Automated hardware testing in production lines and R&D